Overview
NOTE: This example only works in Player for Windows and Composer.
The user authentication methods required to post content to some social media accounts are not supported by Intuiface. As a result, it is not possible for Intuiface to automatically post content to a person's or company's feed.
An alternative is to post Intuiface-hosted content in the cloud and then have Intuiface generate a "share link" as a QR Code. Scanning that QR code on a mobile device will pull up a login prompt for the targeted social media site. The device owner can log in and the content will be posted.
Certain social media sites support the use of a share link. (See this article on HubSpot for details.) These links are typically associated with buttons placed aside shareable content, making it easy for visitors to take the content and place it in their personal social media feeds.
This article puts the above scenario into practice for Facebook.
Download the sample experience
We will be using a sample experience targeting Facebook.
Run the sample experience
Step One: Create a Cloudinary account
To store Intuiface content in the cloud and generate a public URL for that content, we use Cloudinary in this example.
Create a Cloudinary account accepting all of the defaults. Then look for an email containing an account verification link. Click the link in that email.
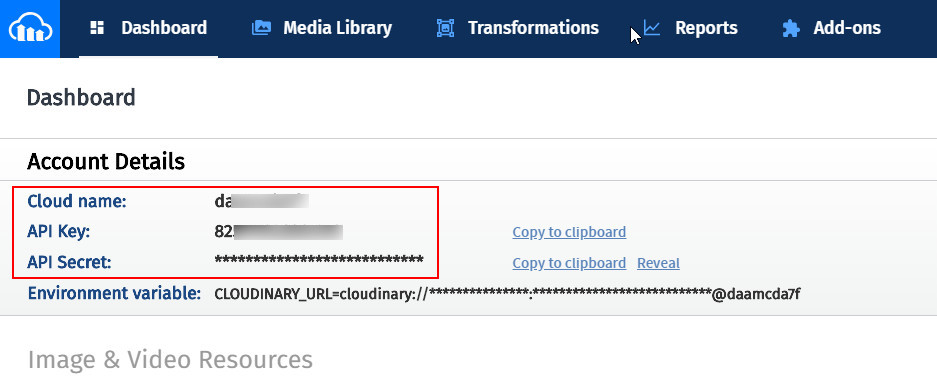
Once your account has been created and verified, gather three pieces of information that can be found at the top of the Cloudinary Console page.
- Cloud name
- API Key
- API Secret
Step Two: Configure the sample experience
Open the sample experience mentioned above in Composer. Then open the Interface Assets panel, select the Cloudinary Image Uploader Interface Asset and - in the Properties panel - enter the three pieces of information you collected from Cloudinary. For information about the "Cloudinary Image Uploader" Interface Asset, see this article.

NOTE: "Cloudinary Image Uploader" Interface Asset is written using .NET and thus can only be used in Player for Windows and Composer, limiting this entire sample experience to Windows PCs.
Step Three: Run the experience
Enter Play Mode in Composer or run the experience in Player for Windows. Use the drawing tools to create a snapshot of the image.
Taking a snapshot will reveal an Upload button. Click the Upload button. Wait about five seconds.
A QR Code will appear. Scan the QR Code using a mobile device. You will be asked to log into Facebook on that mobile device. By logging in, the image will be posted to your Facebook wall.
How it works
Here is a look at what is happening within the sample experience
- Whenever the Snapshot tool is used, the resulting file is saved on the local device, producing a file path. (This path is revealed onscreen in the sample experience.)
- The "Upload" button supplies this file path to the Cloudinary Image Uploader Interface Asset. This interface asset uploads the image to your Cloudinary account and returns a public URL to that image.
- When the public URL is received, the Facebook share link is combined with that public URL (via a binding converter) and the resulting URL is converted into a QR Code.
Modifying the sample for use other social media sites
The Share Link Generator page can be used to produce the share links for various social media sites.
NOTE: The sample experience used in this Facebook example would have to be modified to accommodate the different fields required by each social media site within their share link. For example, for LinkedIn you will also have to specify a title in the share link.
Comments
0 comments
Article is closed for comments.