When creating an experience to be used in a public area, you will probably want to display a screensaver when no one has touched the screen after a specified period of time. The purpose of the screensaver isn't simply to save the screen from burn-in. It is to attract attention and generate interest in whatever service or information the experience has to offer. As a result, you will often hear the screensaver referred to as an attract loop.
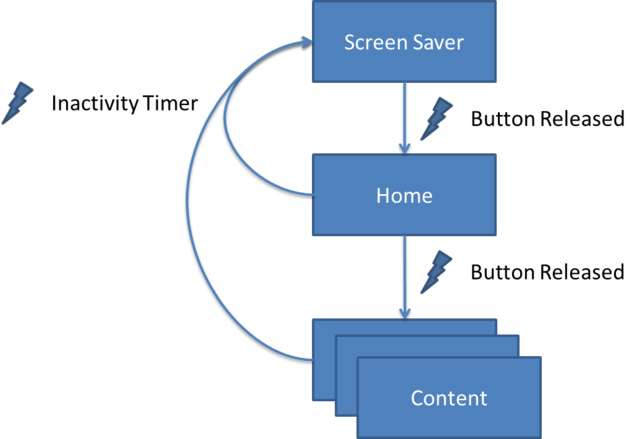
Creation of a screensaver is simple. The idea is to create a dedicated screensaver scene and then use Inactivity Timers on all other scenes. In the graphic below, interaction with the screensaver drives the visitor to whatever you designate as the Home scene and interaction with this Home scene drives visitors to individual content pages. On both the Home scene and content scenes is an Inactivity Timer that, after a specified period of time, automatically sends the experience back to the screensaver scene.
Here are the steps assuming your screensaver will be comprised of a video on an infinite loop. This video could either incorporate text directly or have overlayed text using the Text asset to give instructions to passers-by. A sample project illustrates the basic principles.
- Create a new scene to be used as your screensaver
- Set the scene's Background property to Video and then specify which video you wish to use.
- Just below the Background property, adjust the Volume if necessary and check the Play loop parameter.
- Add a Simple Button to the top layer of this scene and resize it to cover the entire scene.
- Make this button transparent by setting the following parameters
- Flat = true
- Radius = 0
- Fill color -> Opacity = 0
- Outline color -> Opacity = 0
- Remove all text from the Text property.
- Add a navigation action to this now transparent button
- Use either the Go to scene action to always go back to the same scene (a Home Scene for example)
or - Use the Backward navigation history action. It will bring you back to the scene visible before arrival at this screensaver scene
- Use either the Go to scene action to always go back to the same scene (a Home Scene for example)
- In all other scenes, experience layers or the experience itself - your choice depends on how global you want the timer to be - add an Inactivity Timer trigger with a Go to scene navigation action pointing to the Screensaver Scene.
That's it! As mentioned above, this sample project illustrates the basic principles.
Comments
0 comments
Article is closed for comments.